A garbage disposal is a handy kitchen appliance that makes food waste cleanup quick and efficient. But like any appliance, it can malfunction or break down. When that happens, knowing how to repair a garbage disposal can save you time and money. While some issues are easy to fix, others may require replacement. This guide will cover common garbage disposal problems, repair solutions, and step-by-step instructions on replacing the unit if necessary.
1. Understanding How a Garbage Disposal Works
Before diving into repairs, it’s helpful to understand the basic components and functions of a garbage disposal
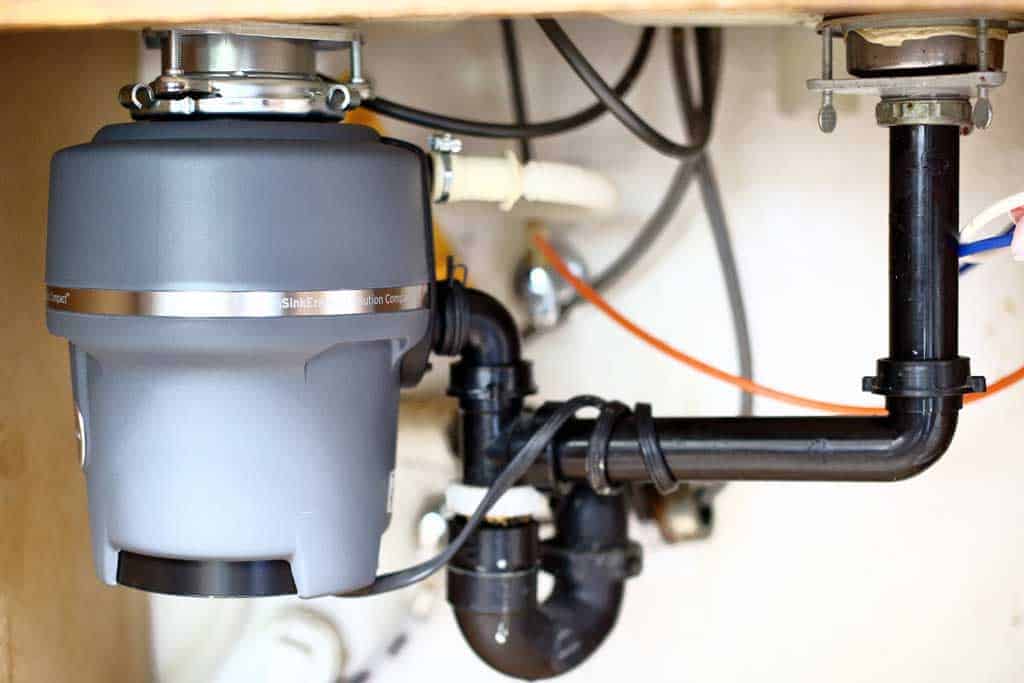
1.1 Key Components
- Motor: Powers the grinding mechanism.
- Grinding Chamber: Where food waste is broken down.
- Impellers: Not blades, but blunt metal pieces that force waste against the shredder ring.
- Shredder Ring: Grinds food waste into small particles.
- Drain Pipe: Allows ground waste to flow into the plumbing system.
- Reset Button: A safety feature that shuts off the disposal during overloads.
1.2 How It Works
When you turn on the disposal, the motor spins the impellers rapidly. As food waste enters the grinding chamber, the impellers force it against the shredder ring, reducing it to small particles that are flushed down the drain with water.
2. Common Garbage Disposal Problems and How to Fix Them
Let’s explore typical garbage disposal issues and the steps to resolve them.
2.1 Garbage Disposal Won’t Turn On
Symptoms:
- No noise or activity when you flip the switch.
- The reset button might be popped out.
Possible Causes:
- Electrical problem.
- Motor overload.
Solution:
- Check the Power Supply:
- Ensure the unit is plugged in.
- Check the circuit breaker or fuse box for a tripped breaker. Reset if necessary.
- Press the Reset Button:
- The reset button (usually red) is located at the bottom of the unit. Press it firmly to reset the motor.
- Check the Wall Switch:
- If the disposal still doesn’t turn on, test the wall switch with a voltage tester. Replace the switch if faulty.
- Check for Loose Wiring:
- Turn off the power and check the wiring connections inside the unit’s electrical box. Tighten any loose wires.
When to Replace:
If the motor doesn’t respond after checking power, wiring, and resetting, the unit may need replacement.
2.2 Garbage Disposal Is Jammed
Symptoms:
- Humming sound when the switch is on.
- No grinding; the impellers don’t spin.
Possible Causes:
- Food particles, utensils, or debris lodged in the grinding chamber.
Solution:
- Turn Off Power:
- Unplug the unit or turn off the circuit breaker.
- Use an Allen Wrench:
- Insert a ¼-inch Allen wrench into the hex hole at the bottom of the disposal. Turn it back and forth to free the jam.
- Use a Wooden Spoon or Tongs:
- Look inside the disposal with a flashlight. Remove any visible debris using a wooden spoon or tongs (never your hand).
- Manually Rotate the Impellers:
- Use the Allen wrench to rotate the impellers until they move freely.
- Reset and Test:
- Press the reset button and turn on the disposal.
When to Replace:
If the motor hums but doesn’t grind even after clearing the jam, the motor might be damaged and need replacement.
2.3 Garbage Disposal Leaks
Symptoms:
- Water pooling under the sink.
- Dripping from the bottom or sides of the unit.
Possible Causes:
- Loose connections.
- Cracked or worn-out seals.
Solution:
- Identify the Leak Source:
- Top Leak: Likely from the flange or sink seal.
- Side Leak: From the dishwasher hose or drain pipe connections.
- Bottom Leak: Indicates internal damage to the unit.
- Tighten Connections:
- Use a wrench to tighten the mounting bolts, drain pipe, and dishwasher hose clamps.
- Replace Seals or Gaskets:
- Replace worn-out gaskets or plumber’s putty under the sink flange.
- Check for Cracks:
- If the unit itself is cracked, replacement is usually the best option.
When to Replace:
Leaks from the bottom of the unit typically mean internal damage, necessitating a replacement.
2.4 Garbage Disposal Makes Loud or Unusual Noises
Symptoms:
- Grinding, clanking, or rattling sounds.
Possible Causes:
- Foreign objects stuck in the grinding chamber.
- Loose internal components.
Solution:
- Turn Off Power:
- Unplug the unit or switch off the breaker.
- Inspect the Chamber:
- Use a flashlight to look for metal objects or debris. Remove them with pliers or tongs.
- Tighten Loose Parts:
- Check for loose screws or components inside the unit. Tighten as needed.
- Test the Unit:
- Run water and turn on the disposal to check if the noise persists.
When to Replace:
Persistent loud noises or grinding sounds may indicate worn-out components, which often require a new unit.
3. How to Replace a Garbage Disposal
If your garbage disposal is beyond repair, replacing it may be the best option. Here’s a step-by-step guide to replacing a garbage disposal.
Tools and Materials Needed
- New garbage disposal unit.
- Plumber’s putty.
- Screwdrivers (Phillips and flathead).
- Adjustable wrench.
- Plumber’s tape.
- Bucket and rags.
Step-by-Step Replacement Guide
Step 1: Turn Off Power
- Unplug the unit or turn off the circuit breaker.
Step 2: Disconnect the Disposal
- Place a bucket under the disposal to catch water.
- Disconnect the drain pipe and dishwasher hose (if applicable).
Step 3: Remove the Old Disposal
- Turn the mounting ring counterclockwise to release the disposal.
- Carefully remove the unit and empty any remaining water.
Step 4: Remove the Sink Flange
- Loosen the mounting bolts and lift out the sink flange.
- Clean the sink area of old plumber’s putty.
Step 5: Install the New Sink Flange
- Apply fresh plumber’s putty around the flange.
- Insert the flange into the sink and secure it with the mounting ring and bolts.
Step 6: Connect the New Disposal
- Attach the new disposal to the mounting ring. Turn it clockwise to lock it in place.
- Reconnect the drain pipe and dishwasher hose.
Step 7: Wire the Disposal
- Connect the electrical wires (black to black, white to white, and green to ground).
- Secure the wires and cover the electrical box.
Step 8: Test the New Unit
- Turn the power back on. Run water and test the disposal to ensure it works properly.
4. Tips for Maintaining Your Garbage Disposal
To keep your garbage disposal in top shape, follow these maintenance tips
- Run Cold Water: Always use cold water when running the disposal to solidify grease and prevent clogs.
- Avoid Hard Items: Do not grind bones, fruit pits, or metal objects.
- Clean Regularly: Grind ice cubes and citrus peels to clean and deodorize the unit.
- Avoid Grease: Never pour fats or oils down the disposal, as they can solidify and cause clogs.
- Run the Disposal Regularly: Frequent use prevents rust and keeps components moving smoothly.
Knowing how to repair a garbage disposal can save you the cost and hassle of calling a plumber for minor issues. Many common problems, such as jams, leaks, and power failures, can be resolved with simple tools and basic knowledge. If your disposal is beyond repair, replacing it is a manageable DIY project with the right guidance.
By maintaining your garbage disposal and addressing issues promptly, you can ensure it continues to serve your kitchen efficiently for years to come.


