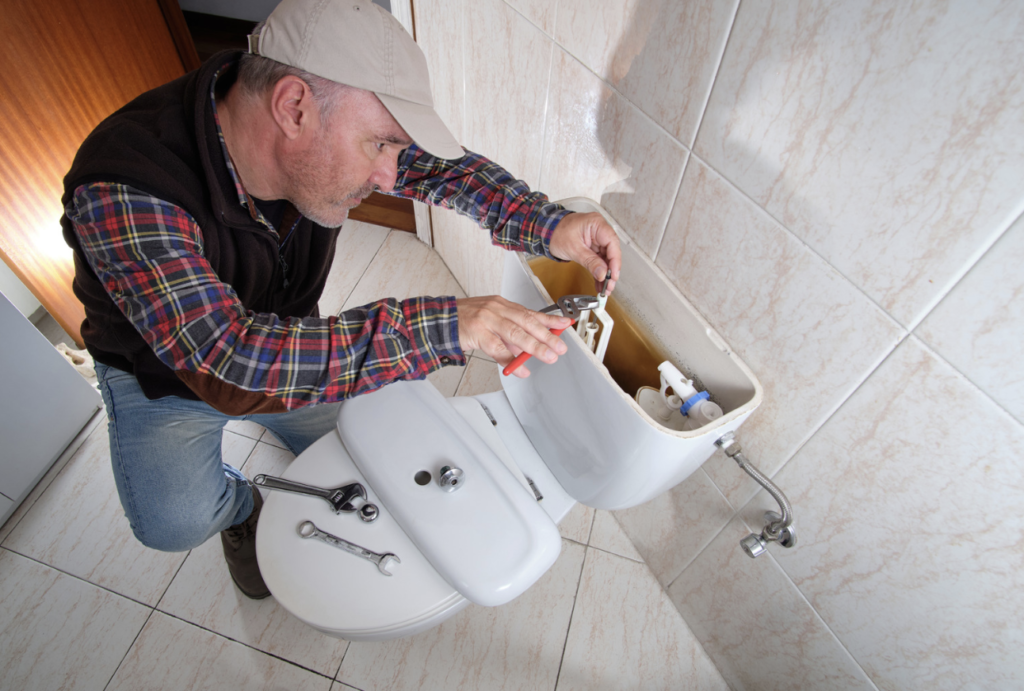
A running toilet is a common plumbing issue that can waste a significant amount of water, increase utility bills, and disrupt household peace. Fortunately, this problem is often easy to fix with a little troubleshooting and some basic tools. This guide will walk you through the causes of a running toilet, how to identify each issue, and the steps needed for effective running toilet repair.
Why Is a Running Toilet a Problem?
Water Waste and Higher Bills
A running toilet may seem like a minor annoyance, but it can lead to considerable water waste over time. Even a small, continuous flow of water can amount to hundreds of gallons per month, raising your water bill and unnecessarily wasting resources.
Common Plumbing Issues
A constantly running toilet is one of the most common plumbing issues homeowners face. This problem is often due to wear and tear on internal toilet components, such as the flapper, fill valve, or flush valve. Understanding these parts and their functions is the first step in fixing the issue and preventing it from recurring.
Key Components of a Toilet
Understanding the basic components of a toilet can make running toilet repair much easier. Here are the main parts to be familiar with:
- Flapper: This rubber seal covers the flush valve, controlling water flow from the tank to the bowl. A faulty or worn-out flapper is one of the most common causes of a running toilet.
- Fill Valve: Also known as the ballcock or refill valve, this component regulates the tank’s water level by controlling water flow from the supply line.
- Flush Valve: The flush valve releases water from the tank into the toilet bowl when you press the handle. If it’s not sealing correctly, water may leak continuously into the bowl.
- Float: The float controls the fill valve, signaling when to stop adding water to the tank. Floats can become misaligned, causing the fill valve to remain open.
Troubleshooting Steps for a Running Toilet
1. Check the Flapper
The flapper is often the primary culprit in a running toilet. Over time, it may warp, deteriorate, or fail to seal properly, allowing water to leak from the tank into the bowl.
- Lift the Tank Lid: Remove the lid and check if the flapper is sealing the flush valve properly. You should see the flapper at the bottom of the tank, connected to the flush handle by a chain.
- Inspect the Flapper: Look for signs of wear, warping, or deterioration. If the flapper is damaged, it won’t create a watertight seal, leading to a constant flow of water.
- Replace the Flapper if Necessary: If the flapper is visibly damaged or not sealing well, replacing it is a simple and cost-effective solution. Flappers are inexpensive and can be purchased at any hardware store.
2. Adjust the Chain Length
The chain connecting the flapper to the flush handle can cause issues if it’s too long or too short. A chain that’s too tight prevents the flapper from closing fully, while a chain that’s too loose may not lift the flapper enough to allow a proper flush.
- Observe the Chain: Flush the toilet and watch the chain’s movement. If it’s too tight or too loose, adjust the length.
- Adjust Chain Length: To adjust the chain, move the hook to a different link. Aim for a length that allows the flapper to open fully during a flush but also allows it to close tightly once the flush is complete.
3. Inspect the Fill Valve and Float
If adjusting the flapper and chain doesn’t solve the issue, the fill valve and float may be causing the running toilet. The fill valve is responsible for controlling the water level, while the float signals the valve when to stop filling the tank.
- Check the Water Level: The water level should be about an inch below the top of the overflow tube. If it’s higher than this, water may be spilling into the overflow tube, causing the toilet to run.
- Adjust the Float: If the water level is too high, adjust the float. In older toilets with a ball float, bend the arm downward slightly to lower the water level. In newer models with a float cup, adjust the float by turning the screw on the fill valve.
- Replace the Fill Valve if Necessary: If adjusting the float doesn’t work, the fill valve may be faulty. Replacing the fill valve can stop the toilet from running and restore normal operation.
4. Examine the Flush Valve
The flush valve may also be responsible for a running toilet if it’s cracked or damaged. Water may leak from the tank into the bowl if the valve fails to seal completely.
- Inspect the Flush Valve: Check for visible cracks or wear. If the flush valve is damaged, it won’t create a proper seal, leading to continuous water flow.
- Replace the Flush Valve: If you identify any damage, replace the flush valve. This repair requires more effort than replacing the flapper, as it involves removing the tank. If you’re unsure, consider hiring a plumber for this step.
Running Toilet Repair Techniques
Replacing the Flapper
If the flapper is the cause of your running toilet, follow these steps for replacement:
- Turn Off the Water Supply: Locate the shut-off valve near the base of the toilet and turn it clockwise to stop the water flow.
- Drain the Tank: Flush the toilet to empty the tank and remove any remaining water with a sponge or towel.
- Remove the Old Flapper: Disconnect the flapper from the chain and the posts at the bottom of the overflow tube.
- Install the New Flapper: Attach the new flapper to the overflow tube posts and connect it to the chain. Ensure that the chain has the correct length.
- Turn the Water Supply Back On: Open the shut-off valve and allow the tank to refill. Test the flush to ensure the new flapper seals properly.
Replacing the Fill Valve
If the fill valve is faulty, replacing it can solve the problem. Here’s how to do it:
- Turn Off the Water Supply: Shut off the water supply to the toilet.
- Drain the Tank: Flush the toilet to empty the tank.
- Disconnect the Old Fill Valve: Unscrew the nut holding the fill valve in place and remove it from the tank.
- Install the New Fill Valve: Insert the new fill valve into the tank and secure it with the nut. Adjust the height according to the manufacturer’s instructions.
- Reconnect the Water Supply: Turn on the water supply, allow the tank to fill, and check for proper operation.
Replacing the Flush Valve
Replacing the flush valve is more involved, as it requires removing the toilet tank. If you’re comfortable with this process, here’s how to proceed:
- Turn Off the Water and Drain the Tank: Shut off the water supply and flush the toilet to empty the tank.
- Disconnect the Tank: Unscrew the bolts that hold the tank to the bowl and carefully lift it off.
- Remove the Old Flush Valve: Unscrew the locknut holding the flush valve in place and remove it.
- Install the New Flush Valve: Position the new flush valve in the hole and secure it with the locknut.
- Reattach the Tank: Reinstall the tank on the bowl, reattach the bolts, and turn on the water supply.
- Test the Flush: Allow the tank to refill and check that the flush valve seals correctly.
Preventive Tips to Avoid Running Toilet Issues
Regularly Inspect Toilet Components
Perform regular inspections of the toilet components, especially the flapper, fill valve, and flush valve. Catching wear and tear early allows you to replace parts before they cause a running toilet.
Avoid Using Chemical Cleaners in the Tank
Chemical cleaners can degrade rubber components like the flapper over time, leading to leaks. Instead, use natural cleaning solutions or mild detergents to clean the tank.
Address Issues Promptly
If you notice a running toilet or a change in flush performance, address the issue as soon as possible. Prompt repairs prevent water waste and ensure that minor issues don’t escalate into more extensive plumbing problems.
Conclusion: Save Water and Money with Running Toilet Repair
A running toilet is a common but manageable plumbing issue. By identifying and addressing the cause, you can save water, reduce your utility bills, and prevent further damage. From adjusting the flapper and chain to replacing the fill or flush valve, these running toilet repair techniques can keep your bathroom functioning smoothly and efficiently.
FAQs
1. What causes a toilet to run continuously?
Common causes include a worn-out flapper, improperly set fill valve, or an incorrect chain length. Addressing these issues can often stop a running toilet.
2. Can a running toilet increase my water bill?
Yes, a running toilet can waste hundreds of gallons per month, significantly increasing water bills. Prompt repair can help prevent this waste.
3. How can I tell if my flapper is the issue?
Check for visible wear, warping, or poor sealing. If the flapper is not creating a watertight seal, it’s likely the cause of your running toilet.
4. When should I replace the fill valve?
Replace the fill valve if adjusting the float doesn’t stop the toilet from running or if you notice water constantly flowing into the overflow tube.
5. Is it difficult to replace a flush valve on my own?
Replacing a flush valve requires removing the tank, which can be challenging. If you’re unsure, consider hiring a professional plumber.

